Battery switch on travel trailer function is crucial for managing your RV’s power. Understanding how to use your battery switch correctly is key to preventing dead batteries, protecting your appliances, and ensuring a smooth camping experience. This guide breaks down the different types of switches, safe usage practices, troubleshooting tips, and everything you need to know to keep your travel trailer’s electrical system running smoothly.
We’ll cover everything from basic functionality and wiring diagrams to advanced troubleshooting and safety procedures. By the end, you’ll be confident in handling your travel trailer’s battery system, avoiding common pitfalls, and maximizing your off-grid adventures.
Understanding Battery Switch Functionality in Travel Trailers
Your travel trailer’s battery switch is a crucial component, acting as a central control for managing power from your trailer’s batteries. It allows you to disconnect your batteries completely for safety and to prevent parasitic drain, or to select which battery bank (if you have two) powers your appliances. Understanding its function is key to maintaining your trailer’s electrical system.
Battery Switch Types
Several types of battery switches are used in travel trailers, each offering different levels of control. The most common are the 1-2-Both-Off and the simpler 1-2-Off switches. The 1-2-Both-Off switch provides the most control, allowing you to select either battery bank (Battery 1 or Battery 2), both simultaneously, or to completely disconnect both. The 1-2-Off switch only lets you select one battery or turn both off; it lacks the “both” option.
Less common are more sophisticated switches with additional features like remote control or monitoring capabilities.
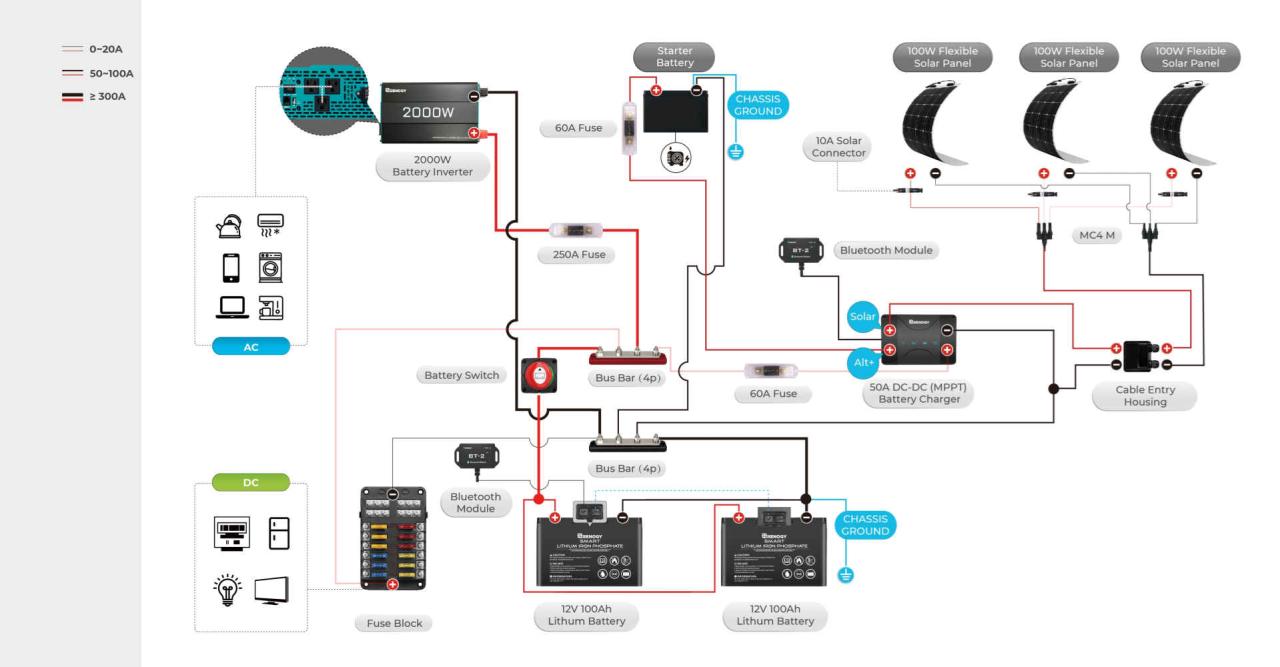
Typical Battery Switch Wiring Diagram
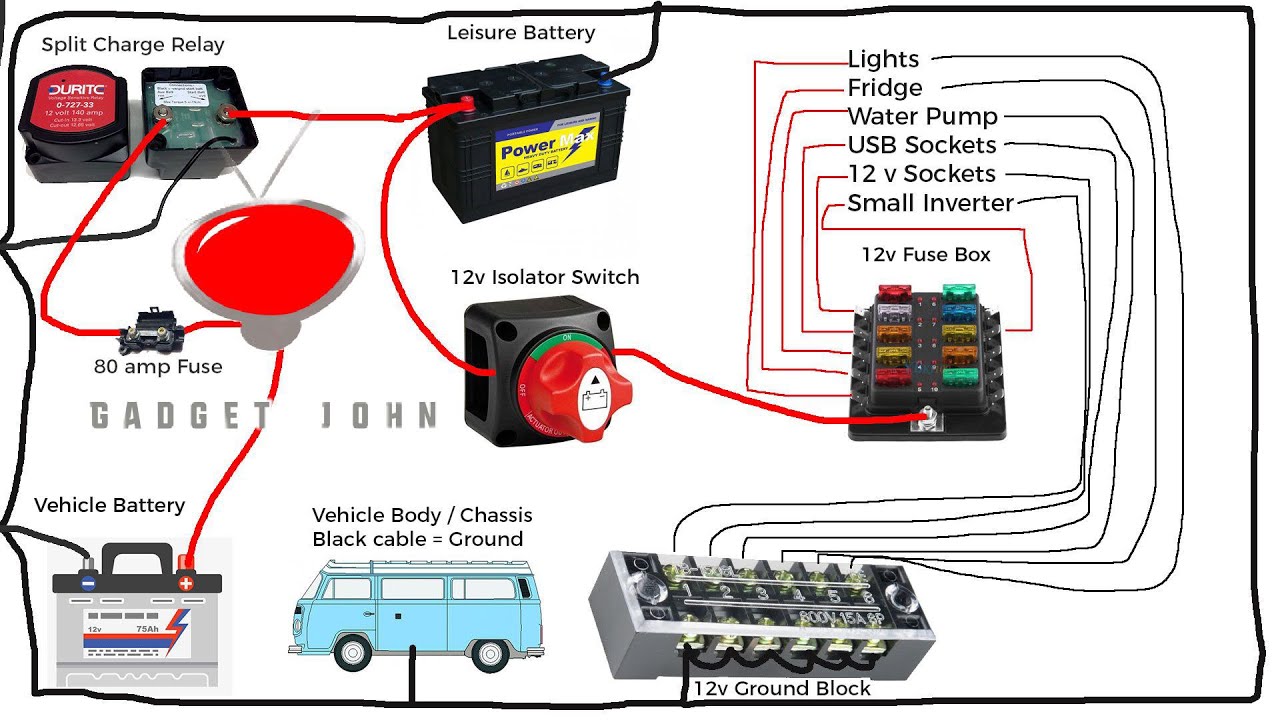
A typical battery switch setup involves several key components. The batteries (usually two 12V deep-cycle batteries), the battery switch itself, and the main power distribution panel are interconnected. The positive (+) cables from each battery connect to the input terminals on the battery switch. The output terminal of the switch then connects to the positive bus bar on the main power distribution panel.
Negative (-) cables from each battery are usually directly connected to the chassis of the trailer (ground), providing a common ground for the entire electrical system. This setup ensures that all the loads in your trailer receive power from the selected battery or batteries. It’s crucial to maintain a good, clean connection at each point to avoid voltage drops and potential problems.
Comparison of Battery Switch Types
| Feature | 1-2-Both-Off Switch | 1-2-Off Switch |
|---|---|---|
| Number of Positions | Four (1, 2, Both, Off) | Three (1, 2, Off) |
| Control | Independent control of each battery or combined use | Selection of one battery or complete disconnection |
| Advantages | Maximum flexibility; allows charging one battery while using the other; prevents complete power loss during charging | Simpler design; lower cost |
| Disadvantages | More complex wiring; slightly higher cost | Less flexible; potential for complete power loss if one battery fails |
Connecting and Disconnecting Batteries
Connecting and disconnecting your travel trailer batteries using a battery switch is a crucial part of maintaining your power system. Doing it correctly ensures safe operation and prevents damage to your batteries and other electrical components. This section will guide you through the process, highlighting best practices and potential pitfalls.
Properly using your battery switch is essential for managing power in your travel trailer. It allows you to isolate batteries for maintenance, prevent accidental discharges, and select which battery bank powers your appliances.
So, you’re an audiophile who travels? Awesome! Check out this guide on audiophile travel setups for tips on packing your precious gear. It’s all about finding that sweet spot between portability and sound quality. Then, once you’ve got your portable setup dialed in, consider this other resource on audiophile travel setups for some advanced techniques to minimize noise and maximize your listening experience on the go.
Seriously, it’ll change your travel game.
Safe Battery Connection and Disconnection Procedures
Before you begin any work with batteries, always remember safety first! Wear safety glasses to protect your eyes from potential acid splashes. Also, ensure the area is well-ventilated to avoid inhaling potentially harmful fumes. Never work on batteries near open flames or sparks.
- Turn off all appliances: Before making any connections or disconnections, ensure all appliances in your travel trailer are turned off. This prevents unexpected surges or short circuits.
- Locate the battery switch: Find the battery switch in your travel trailer. It’s usually located near the batteries themselves, often in a compartment accessible from the outside.
- Identify switch positions: Familiarize yourself with the switch’s positions. Typically, there are positions for “Both,” “Battery 1,” “Battery 2,” and “Off.” Your specific switch may have slightly different labeling.
- Switch to the “Off” position: Before disconnecting or connecting any batteries, always move the switch to the “Off” position. This completely isolates the batteries from the trailer’s electrical system.
- Connect/Disconnect batteries (if applicable): If your battery setup allows for physically connecting or disconnecting individual batteries, do so only after the switch is in the “Off” position. Follow the manufacturer’s instructions for your specific battery type and connection method.
- Select desired switch position: Once connections are made (or after disconnecting), switch to the desired position (“Both,” “Battery 1,” or “Battery 2”) depending on whether you want to charge both batteries, use only one, or isolate both from the system.
Battery Terminal and Connection Maintenance, Battery switch on travel trailer function
Maintaining clean and tight battery terminals is crucial for efficient power transfer and preventing corrosion. Regular inspection and cleaning will extend the life of your batteries and prevent problems.
So, you’re an audiophile who travels? Awesome! Check out this guide on audiophile travel setups for tips on keeping your sound quality high even on the go. It’s all about finding the right balance between portability and sound quality. Then, if you want to delve deeper into the technical side of things, consider exploring resources like this one on audiophile travel setups which focuses on practical solutions and equipment compatibility.
Remember, a great listening experience shouldn’t be limited by your location!
- Regular inspection: Inspect your battery terminals regularly for corrosion, looseness, or damage. Look for white, powdery buildup (corrosion) which restricts current flow.
- Cleaning: Use a wire brush or terminal cleaner to remove corrosion. A baking soda and water paste can also effectively neutralize battery acid.
- Tightening: Ensure all terminal connections are tight. Loose connections can lead to poor performance and overheating.
- Protective coatings: Consider applying a protective coating to your terminals after cleaning to prevent future corrosion. Many products are available at auto parts stores.
Potential Problems from Incorrect Battery Switch Usage
Improper use of the battery switch can lead to several problems, some of which can be dangerous. Understanding these potential issues helps you avoid them.
- Short circuits: Connecting or disconnecting batteries while the switch is in the “On” position can cause a short circuit, potentially damaging the switch, wiring, or even starting a fire.
- Overloading: Using appliances that draw more power than your battery bank can handle can lead to low voltage issues and damage to sensitive electronics. Pay attention to the amperage ratings of your appliances and batteries.
- Battery damage: Incorrect switching can lead to premature battery failure, reduced lifespan, and decreased performance.
Battery Switch Usage Flowchart
This flowchart visually represents the process of using the battery switch in different scenarios.
(Imagine a flowchart here. It would start with a decision point: “Need to work on batteries or use appliances?” If “Yes” to batteries, it would branch to “Turn off all appliances,” then “Switch to OFF,” then “Perform battery maintenance,” then “Switch to desired position.” If “No” to batteries, it would branch to “Switch to desired position” and then “Turn on appliances.”)
Troubleshooting Common Battery Switch Issues
Your travel trailer’s battery switch is a crucial component, and problems with it can leave you stranded. Fortunately, most issues are easily diagnosed and fixed with some basic tools and knowledge. This section will guide you through common problems, their diagnosis, and solutions.
Battery switch problems often stem from simple issues, but ignoring them can lead to more significant problems like dead batteries or even electrical fires. Early detection and proper maintenance are key to preventing these issues.
Identifying Common Problems
Common problems with battery switches include corrosion on the terminals, loose connections, and ultimately, switch failure itself. Corrosion builds up over time due to exposure to the elements and can impede the flow of electricity. Loose connections, often caused by vibration during travel, can create intermittent power or complete failure. A faulty switch might simply stop working, requiring replacement.
Sometimes, the problem isn’t the switch itself, but a blown fuse in the circuit.
Diagnosing Battery Switch Problems
Diagnosing a faulty battery switch involves a systematic approach. First, visually inspect the switch and its connections for corrosion. Look for green or white powdery deposits on the terminals and wires. If corrosion is present, carefully clean the terminals with a wire brush and baking soda solution. Next, check the tightness of all connections.
Loose nuts or bolts should be tightened securely. If you have a multimeter, you can test the voltage across the switch terminals in different positions (both batteries connected, only one, etc.) to confirm if the switch is correctly routing power. A low or absent voltage reading in a position where you expect power indicates a problem with either the switch or the wiring.
Finally, check any related fuses; a blown fuse can mimic a faulty switch.
Replacing a Faulty Battery Switch
Replacing a faulty battery switch is relatively straightforward. First, disconnect both battery cables from the batteries to prevent accidental shorts. Then, carefully remove the switch from its mounting location. Take note of how the wires are connected; it’s often helpful to take a picture. Install the new switch, ensuring all connections are secure and tight.
Reconnect the battery cables, and test the switch to confirm its functionality. Remember to always consult your trailer’s wiring diagram for specific instructions.
Troubleshooting Guide
This guide summarizes common issues and their solutions. Remember safety first – always disconnect the batteries before working on the electrical system.
- Problem: No power to appliances even with batteries connected. Solution: Check the battery switch position. Check fuses. Inspect all connections for corrosion or looseness. Test switch functionality with a multimeter.
- Problem: Intermittent power to appliances. Solution: Inspect connections for looseness. Look for corrosion on terminals and clean them. Consider replacing the switch if the problem persists.
- Problem: One battery consistently discharges faster than the other. Solution: Verify that the switch is correctly isolating the batteries when only one is used. Check for parasitic draws on that battery (e.g., a constantly running light).
- Problem: Switch feels loose or difficult to operate. Solution: Tighten mounting screws. If the problem persists, replace the switch.
- Problem: Blown fuse related to the battery switch. Solution: Replace the fuse with the correct amperage. Investigate the cause of the blown fuse – a short circuit needs to be addressed before replacing the fuse again.
Battery Switch and its Impact on Travel Trailer Systems
Your travel trailer’s battery switch is the central control for your 12-volt DC power. Understanding how it affects different systems is crucial for efficient power management and preventing costly battery damage. This section details the switch’s influence on your trailer’s electrical components and emphasizes the importance of proper usage.The battery switch acts as a gatekeeper, controlling the flow of power from your trailer batteries to various appliances and systems.
When the switch is in the “on” position, power flows freely, enabling the operation of lights, water pumps, refrigerators (if 12V), and other DC-powered devices. Conversely, when the switch is “off,” it completely disconnects the batteries, preventing any drain, even when the trailer is not in use. This is vital for preserving battery life and preventing a dead battery situation when you return to your trailer.
Power Draw of Different Systems
Different systems in your travel trailer draw varying amounts of power. For example, interior lights typically consume a relatively small amount of power compared to the water pump, which demands considerably more amperage when in operation. A refrigerator, especially a 12V model, will draw a significant amount of current. Understanding these differences helps you manage your power resources effectively.
For instance, running multiple power-hungry appliances simultaneously could quickly deplete your batteries, even with the switch on. Proper planning and awareness of individual system power demands can help you avoid this.
Preventing Battery Drain and Damage Through Proper Battery Switch Usage
Leaving the battery switch in the “on” position while your travel trailer is not in use can lead to significant battery drain, especially if you have a parasitic drain (a small but constant draw from something like a faulty light or improperly wired system). This can result in a dead battery when you’re ready to use your trailer, requiring a jump start or potentially causing long-term battery damage.
Conversely, always ensuring the switch is “off” when the trailer is stored for an extended period protects your batteries, extending their lifespan and preventing premature failure. Regularly checking your battery voltage levels can help you identify and address any unexpected drain issues.
Visual Representation of Battery Switch Interaction
Imagine a simple diagram. At the top, you have two battery symbols representing your trailer batteries. From these batteries, a thick line extends downwards, representing the main positive (+) and negative (-) battery cables. This line connects to a rectangular box labeled “Battery Switch.” Three lines branch out from the bottom of the battery switch box: one labeled “Lights,” one labeled “Water Pump,” and one labeled “Refrigerator (12V).” Each of these lines represents a separate circuit within the trailer.
Arrows on these lines indicate the flow of electricity when the battery switch is “on.” When the switch is “off,” the lines are effectively severed, preventing power flow to these systems. A small, thinner line might also branch off, representing a smaller constant draw (parasitic drain) that might still occur even with the switch off. This illustrates how the battery switch controls the power flow to all the various systems.
Safety Precautions and Best Practices: Battery Switch On Travel Trailer Function
Working with batteries and the electrical systems in your travel trailer requires caution. Improper handling can lead to injury from electrical shock, burns, or exposure to corrosive battery acid. Following safe practices is crucial for protecting yourself and your equipment. This section details essential safety measures and best practices for maintaining your travel trailer’s battery system.
Before undertaking any work on your travel trailer’s electrical system, remember that safety is paramount. Always prioritize your well-being and follow these guidelines meticulously.
Necessary Tools and Equipment
Proper tools are essential for safe and effective battery maintenance and switch repair. Having the right equipment minimizes the risk of accidents and ensures you can complete the task efficiently. Improper tools can damage components or lead to injury.
- Battery terminal cleaner and wrench
- Screwdrivers (Phillips and flathead, various sizes)
- Wire cutters/strippers
- Multimeter
- Safety glasses
- Gloves (rubber or nitrile)
- Baking soda and water (for neutralizing spilled acid)
Disconnecting the Battery
Disconnecting the battery before working on any part of the electrical system is a fundamental safety precaution. This prevents accidental short circuits and protects you from electrical shock.
The process involves carefully removing the negative (-) terminal connection first, followed by the positive (+) terminal. Always use the correct size wrench to avoid damaging the terminals. After disconnecting, keep the wrench away from the terminals to prevent accidental contact.
Personal Protective Equipment (PPE)
Using appropriate PPE is crucial when handling batteries and electrical components. Exposure to battery acid or electrical shock can have severe consequences.
Essential PPE includes safety glasses to protect your eyes from splashes of battery acid, rubber or nitrile gloves to protect your hands from acid and electrical shock, and closed-toe shoes to protect your feet from dropped tools or accidental spills. Consider using a face shield for added protection if working in close proximity to the battery.
Mastering your travel trailer’s battery switch is a vital skill for any RV owner. By understanding its function, practicing safe usage, and knowing how to troubleshoot common problems, you’ll ensure reliable power for all your adventures. Remember, proper battery maintenance and safe handling are paramount for preventing damage and ensuring a safe and enjoyable camping experience. So, get out there and enjoy the open road!
Answers to Common Questions
What happens if I leave my battery switch in the “off” position?
Leaving the switch off completely disconnects both your house and chassis batteries from each other and from the trailer’s electrical system. This prevents any drain on your batteries, but also means you won’t have any power to your appliances.
How often should I check my battery terminals?
Inspect your battery terminals at least every three months for corrosion. Clean them as needed to maintain good connections and prevent power loss.
Can I use a battery switch to charge both batteries simultaneously?
Yes, most battery switches allow you to connect both batteries to the charger at once. However, ensure your charger is capable of handling the combined amperage of both batteries.
My battery switch feels loose. Should I be concerned?
A loose battery switch could indicate a problem with the mounting or internal components. This needs attention as it could lead to poor connections or even failure. It’s best to have it checked by a professional.
